►English
I’m learning how to sew this year. {Here’s my post about my first steps in sewing, the tools you’ll need and a lot of resources}
I needed a home for all of my pins and needles, and I tried to document every step of making this pretty pin cushion so that this tutorial is great for other sewing beginners. I hope you’ll like it – and please feel free to ask any questions in the comments!
►Deutsch
Dieses Jahr möchte ich nähen lernen. {Hier findest du meinen Post über meine ersten Schritte in der Welt des Nähens, die Werkzeuge, die man braucht und viele weitere Ressourcen}
Ich brauchte etwas, um meine Nadeln aufzubewahren, und habe versucht, jeden Schritt beim Nähen dieses schönen Nadelkissens zu dokumentieren, damit andere Nähanfänger diesem Tutorial gut folgen können. Ich hoffe, es gefällt dir – und wenn du Fragen hast, stell sie jederzeit gerne in den Kommentaren!

 You can substitute the cotton wool for a filling material of your choice.
On top of that: scissors, paper, sewing pins, needles and thread & your sewing machine [but you could probably sew this by hand as well].
You can substitute the cotton wool for a filling material of your choice.
On top of that: scissors, paper, sewing pins, needles and thread & your sewing machine [but you could probably sew this by hand as well].
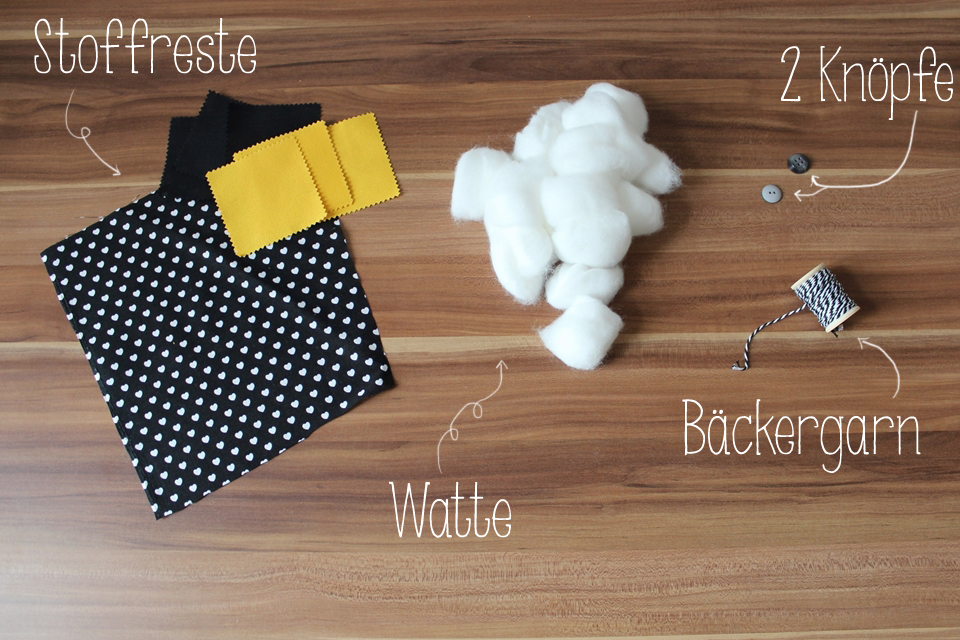 Die Watte könnt ihr natürlich durch das Füllmaterial eurer Wahl ersetzen.
Außerdem: Stoff- und Papierschere, Papier, Stecknadeln sowie Nadel und Faden & eine Nähmaschine [aber ich denke, man könnte es auch von Hand nähen!]
Die Watte könnt ihr natürlich durch das Füllmaterial eurer Wahl ersetzen.
Außerdem: Stoff- und Papierschere, Papier, Stecknadeln sowie Nadel und Faden & eine Nähmaschine [aber ich denke, man könnte es auch von Hand nähen!]

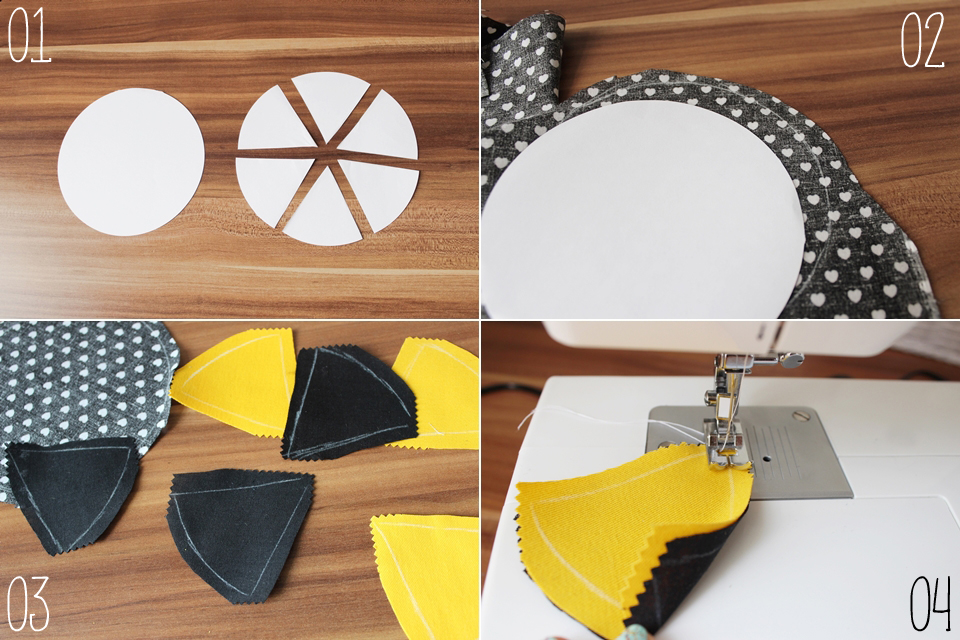
01. Cut out two circles in your desired diameter. Cut the second circle into six parts.
02. Draw and cut out a circle…
03. … and the six triangles from the fabric with some seam allowance.
04. Then start sewing the triangles together, right side on right side. Use a shortened stitch length.
At this point I realized that I’m sewing the symbol for nuclear power – which isn’t necessarly what I’m looking for in a pin cushion. But if that’s your thing, carry on! I just added some blue to the mix.
01. Schneide aus dem Papier zwei Kreise in deiner gewünschten Größe aus. Teile einen davon nochmal in sechs Dreiecke.
02. Übertrage nun den Kreis…
03. … und die Dreiecke auf den Stoff und schneide sie mit ein wenig Nahtzugabe aus.
04. Jetzt beginnst du, die Dreiecke an der langen Seite zusammenzunähen, immer rechts auf rechts. Dabei am besten einen engen Stich benutzen.
An diesem Punkt habe ich dann auch gemerkt, dass ich gerade das Atomkraftsymbol zusammennähe. Ist jetzt nicht so mein Fall – aber wer darauf steht, bitte weitermachen! Ich habe einfach noch blauen Stoff dazugenommen.
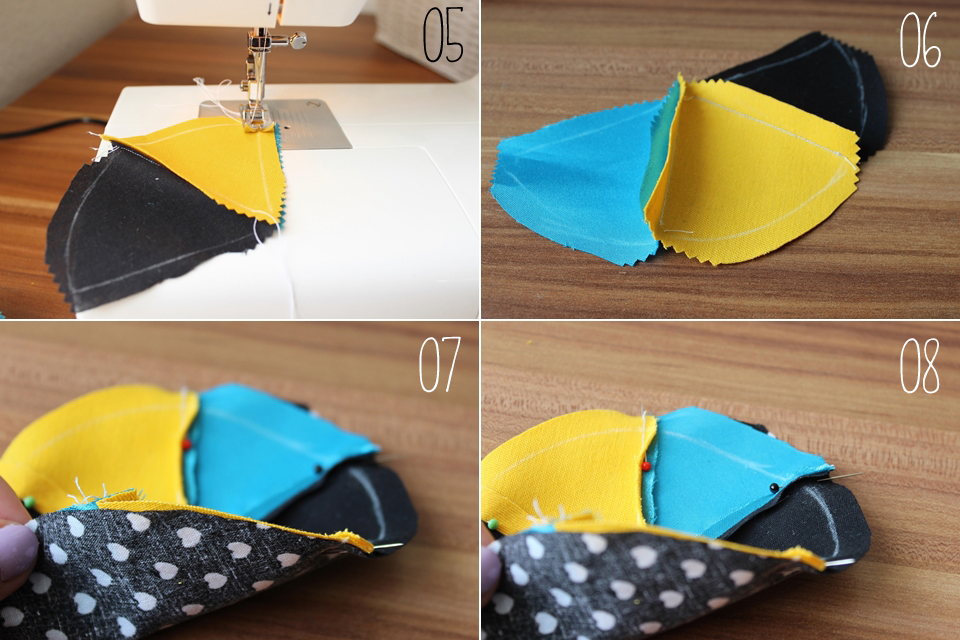
05. Keep on sewing the triangles together.
06. Keep going until you finish the circle.
07. Now join your two circles, right side on right side…
08. … and pin them together.
05. Immer weiter die Dreiecke zusammennähen.
06. Und noch weiter, bis der Kreis aus den Dreiecken vollständig ist.
07. Jetzt beide Kreise rechts auf rechts aufeinander legen…
08. … und feststecken.
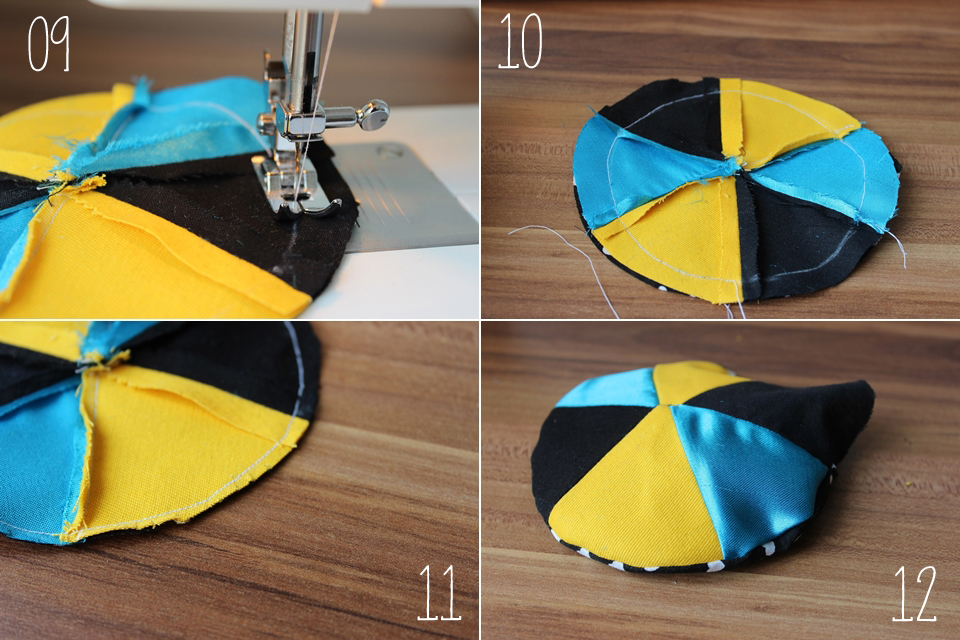
09. Now sew the circles together, leaving a small opening.
10. It should look similar to this.
11. You can now cut a little bit off the seam allowance.
12. Turn your circle to the right side.
09. Als nächstes die beiden Kreise zusammennähen und dabei einen Teil offen lassen.
10. Das Ganze sollte dann in etwa so aussehen.
11. Jetzt ein wenig von der Nahtzugabe abschneiden.
12. Nun das Nadelkissen auf die richtige Seite umstülpen.
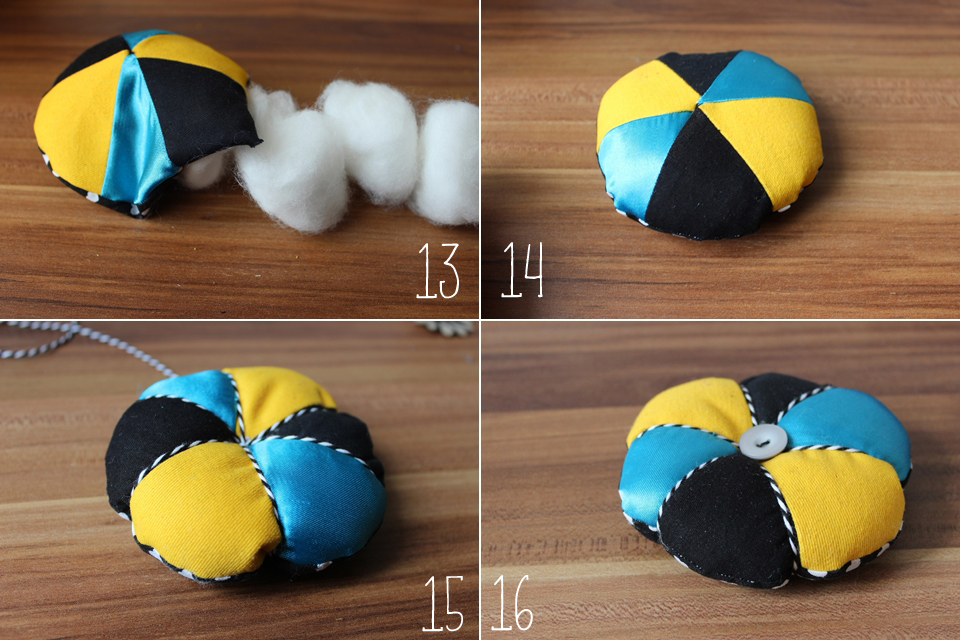
13. Stuff the pin cushion with cotton wool. It will probably need more filling material than you expect, so add some more.
14. Hand-sew the pin cushion close. As you can see, my center is far from perfect – but we won’t see any of that once we add that button.
15. User the backer’s twine and stitch repeatedly through the center of the pin cushion, forming sections where the triangles touch. Pull tightly!
16. And finally, sew on a button on the top and the bottom in the center of your pin cushion.
13. Das Nadelkissen mit der Watte ausstopfen. Dabei braucht man grundsätzlich mehr Watte als erwartet – also weiterstopfen.
14. Die Öffnung wird mit der Hand vernäht. Wie man sieht, ist die Mitte meines Kreises alles andere als perfekt – aber die sieht man gleich gar nicht mehr, wenn der Knopf angenäht wurde.
15. Als nächstes mit dem Bäckergarn immer wieder durch die Mitte nähen und dadurch sechs Teile bilden. Feste ziehen!
16. Abschließend noch jeweils einen Knopf in die Mitte der beiden Seiten nähen.
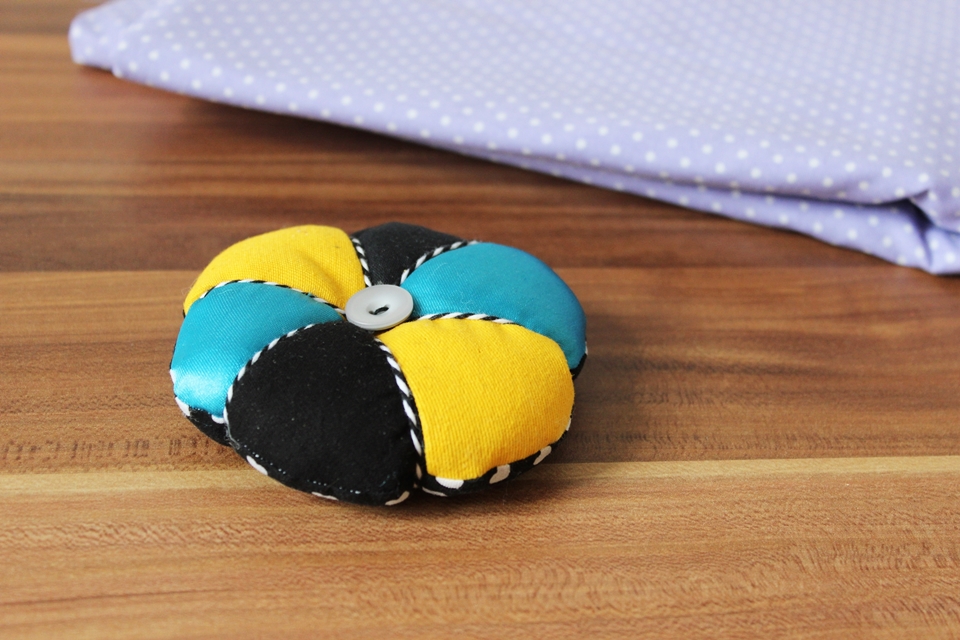
And you’re done! Meet the new, pretty home of your sewing pins and needles!
[By the way, the other side is also pretty – but my pictures aren’t, so you’ll just have to trust my word… ]
Tada, fertig! Darf ich vorstellen? Das neue, hübsche Zuhause deiner Stecknadeln!
[Übrigens ist die andere Seite auch hübsch geworden, nur meine Bilder davon leider nicht. Also musst du mir da mal vertrauen… ]
Have fun sewing!
I’d love to see your results!
Viel Spaß beim Nähen!
Ich würde mich freuen, dein Ergebnis zu sehen!


5 Kommentare
das sieht ja mal richitg süß aus 🙂
25. Mai 2013 um 13:50schön gemacht!
what a cute idea 🙂
25. Mai 2013 um 13:55That came out so beautifully! Well done 🙂
25. Mai 2013 um 17:24Ich finde dein Stecknadelkissen ist richtig toll geworden!;)
26. Mai 2013 um 18:56Ich wünschte ich hätte auch eine Nähmaschine hier stehen, dann würde ich sofort loslegen.
Ich bin wirklich schon gespannt was du als nächstes nähst!
Liebe Grüße, Sarah
Wow! Das geht ja viel einfacher, als es am Ende aussieht! Ich dachte erst, du hättest da irgendwas total abgefahrenes beim Nähen gemacht, damit das so dreidimensional wird 🙂 Cooler Trick mit dem Bäckergarn.
27. Mai 2013 um 12:12