In my final guestpost for this series, I want to introduce you to gorgeous Stefanie of
Squeaky Swing. When I first visited Stefanie’s blog, I instantly knew that I found something special: Her blog design is drawn and written by herself, and of course the blog is filled with pretty things – beautiful outfit posts, inspiring Do It Yourself – tutorials, yummy recipes, wonderful photographs of her life as a young teacher in Switzerland and inspiration posts that give you even more ideas. Everything has a sort of retro-vintage-vibe that I love – I think ModCloth should sponsor this girl’s wardrobe already! :]
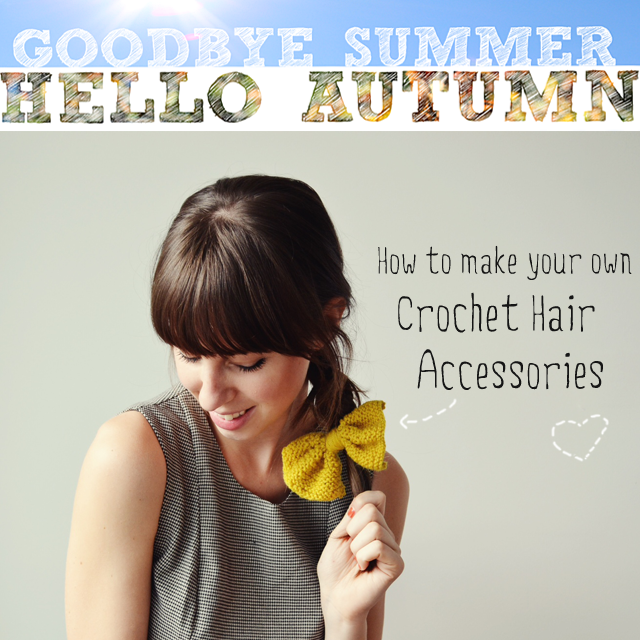
Today Stefanie will show you how to make your own crochet hair accessories. You know how I love bows… So the tutorial definitely makes me want to finally learn how to crochet and knit!
![kathastrophal // meet Stefanie [Squeaky Swing]](https://kathastrophal.de/wp-content/uploads/2012/09/squeakyswing.png) Als letzte Gastposterin dieser Serie darf ich euch heute die hinreißende Stefanie von Squeaky Swing vorstellen. Als ich zum ersten Mal auf Stefanies Blog war, wusste ich direkt dass ich etwas besonderes entdeckt hatte: Ihr gesamtes Blog-Design wurde von ihr selbst gezeichnet und geschrieben, und der Blog selbst quillt nur so über vor hübschen Dingen – wunderschöne Outfitposts, inspirierende Do It Yourself – Anleitungen, leckere Rezepte, wunderbare Fotografien von ihrem Leben als junge Lehrerin in der Schweiz und Inspirationsbeiträge, die immer noch viel mehr Ideen liefern. Das Ganze hat so einen gewissen Retro-Vintage-Touch, den ich liebe – Ich glaube ModCloth sollte dringend mal Sponsor für den Kleiderschrank der Hübschen werden. :]
Heute zeigt euch Stefanie, wie man selbst gehäkelte Haar-Accessoires zaubern kann. Ihr wisst ja bestimmt, dass ich Schleifchen liebe… Dieses Tutorial sorgt also definitiv dafür, dass ich endlich Stricken und Häkeln lernen will!
Als letzte Gastposterin dieser Serie darf ich euch heute die hinreißende Stefanie von Squeaky Swing vorstellen. Als ich zum ersten Mal auf Stefanies Blog war, wusste ich direkt dass ich etwas besonderes entdeckt hatte: Ihr gesamtes Blog-Design wurde von ihr selbst gezeichnet und geschrieben, und der Blog selbst quillt nur so über vor hübschen Dingen – wunderschöne Outfitposts, inspirierende Do It Yourself – Anleitungen, leckere Rezepte, wunderbare Fotografien von ihrem Leben als junge Lehrerin in der Schweiz und Inspirationsbeiträge, die immer noch viel mehr Ideen liefern. Das Ganze hat so einen gewissen Retro-Vintage-Touch, den ich liebe – Ich glaube ModCloth sollte dringend mal Sponsor für den Kleiderschrank der Hübschen werden. :]
Heute zeigt euch Stefanie, wie man selbst gehäkelte Haar-Accessoires zaubern kann. Ihr wisst ja bestimmt, dass ich Schleifchen liebe… Dieses Tutorial sorgt also definitiv dafür, dass ich endlich Stricken und Häkeln lernen will!
Hey everyone, I’m so glad to be here on Katha’s pretty blog today! My name is Stefanie and you can meet me on my blog
Squeaky Swing where I love writing about fashion, DIY and everyday life. I have prepared an easy DIY for you guys if you like handmade hair accessories. Well I do, so I thought I want to make my very own crochet hair accessories as I have seen them all around the web. So here’s how:
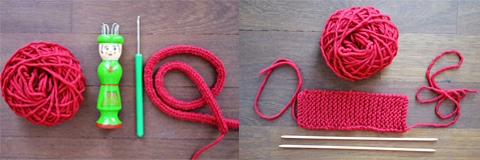
What you’ll need: A cord made with a Knitting Nancy (see how it works
here), and a rectangular piece of knitted fabric (about 10 loops and 15cm in length)
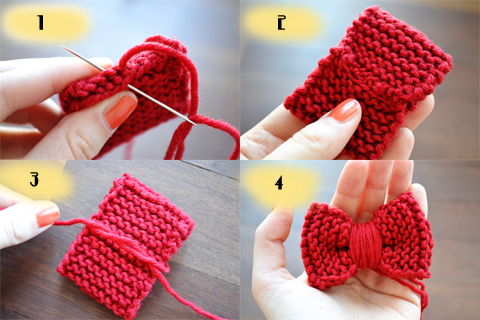
Step 1: Sew the fabric together with easy stitches.
Step 2: This is how it’ll look after Step 1.
Step 3: Cut a thread of your wool and tie it around the middle of the knitted piece, front up. Tie it really close and wrap the thread around your piece tying a knot at the back and leaving about 10cm of thread.
Step 4: This is the front after Step 3.
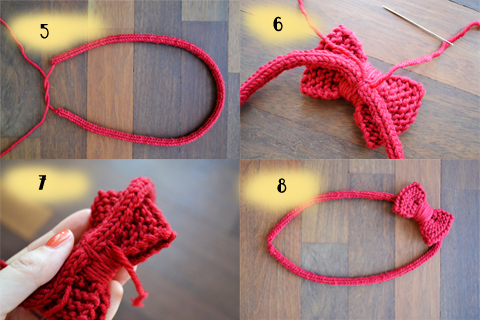
Step 5: Before you knit the cord measure the volume of your head and then knit this length. When finished tie the remaining threads tight and cut them off.
Step 6: Tie the bow to the cord, really tight!
Step 7: If you want to you can sew the whole length of the bow to the cord so it’ll hold really well.
Step 8: DONE! Yay!!! –> I tied my bow a little bit to the side of the cord, because I’m going to wear it on the side of my head anyway.
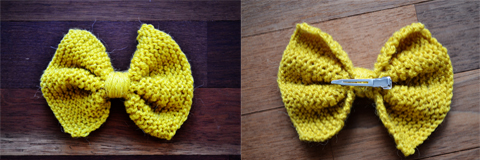
If you feel like it you can use the same technique to make a bigger bow which you can stitch to your favorite dress.
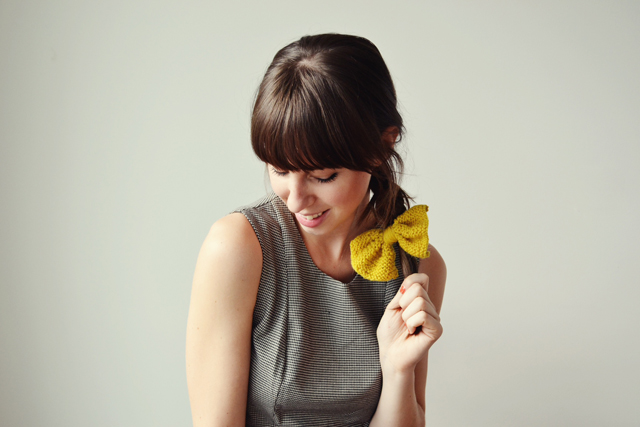
Here are some ideas on how you can wear your handmade accessories. Have fun!


It was so much fun being here and preparing this post for the lovely Katha. Thank you so much!

Thank you so much for this lovely tutorial, dear Stefanie! ♥
Vielen lieben Dank für dieses wunderbare Tutorial, liebe Stefanie! ♥
[I’m on vacation & taking a little blogging break right now. You can follow along
on Instagram if you’d like!
Im Moment bin ich im Urlaub & mache eine kleine Blog-Pause. Wenn ihr mögt, könnt ihr ein bisschen davon bei Instagram mitbekommen!]


![kathastrophal // meet Lu [Luloveshandmade]](https://kathastrophal.de/wp-content/uploads/2012/09/luloveshandmade.png)

 Hallo liebe LeserInnen von Kathas wunderbarem Blog KathaStrophal! 🙂 Ich bin Lu von Luloveshandmade und Katha war so lieb mich einzuladen, so dass ich zu ihrer Aktion „Goodbye Summer, Hello Autumn“ eine Anleitung beisteuern kann. 🙂
Ich möchte euch zeigen wie man mit einfachen Mitteln und aus Resten eine schicke und bunte Wimpelkette als Herbstdeko machen kann. Viel Spaß! 🙂
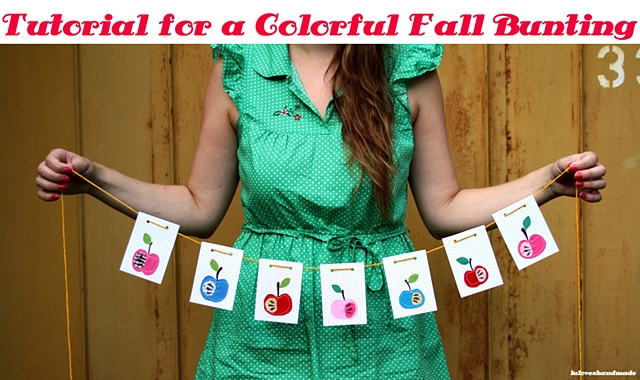
Hello dear readers of Katha’s awesome blog KathaStrophal! 🙂 I’m Lu of Luloveshandmade and Katha was so kind to invite me for her special “Goodbye Summer, Hello Autumn” so that I could contribute a tutorial.
I want to show you how to make a pretty and colorful bunting as decor for fall with simple means and with using fabric scraps. Have fun! 🙂
Hallo liebe LeserInnen von Kathas wunderbarem Blog KathaStrophal! 🙂 Ich bin Lu von Luloveshandmade und Katha war so lieb mich einzuladen, so dass ich zu ihrer Aktion „Goodbye Summer, Hello Autumn“ eine Anleitung beisteuern kann. 🙂
Ich möchte euch zeigen wie man mit einfachen Mitteln und aus Resten eine schicke und bunte Wimpelkette als Herbstdeko machen kann. Viel Spaß! 🙂
Hello dear readers of Katha’s awesome blog KathaStrophal! 🙂 I’m Lu of Luloveshandmade and Katha was so kind to invite me for her special “Goodbye Summer, Hello Autumn” so that I could contribute a tutorial.
I want to show you how to make a pretty and colorful bunting as decor for fall with simple means and with using fabric scraps. Have fun! 🙂
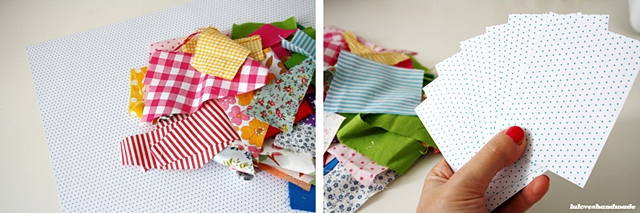 Dazu braucht ihr bloß Pappkarton, viele bunte Stoffreste, Nadel und Faden oder eine Nähmaschine, Kleber (ich habe den weißen Bastelkleber aus dem Idee Markt genommen), einen braunen Filzstift, einen Locher und Wolle.
You only need some cardboard, many colorful fabric scraps, needle and thread or a sewing machine, glue (I have used white crafting glue from Idee), a brown felt tip, a punch and wool.
Dazu braucht ihr bloß Pappkarton, viele bunte Stoffreste, Nadel und Faden oder eine Nähmaschine, Kleber (ich habe den weißen Bastelkleber aus dem Idee Markt genommen), einen braunen Filzstift, einen Locher und Wolle.
You only need some cardboard, many colorful fabric scraps, needle and thread or a sewing machine, glue (I have used white crafting glue from Idee), a brown felt tip, a punch and wool.
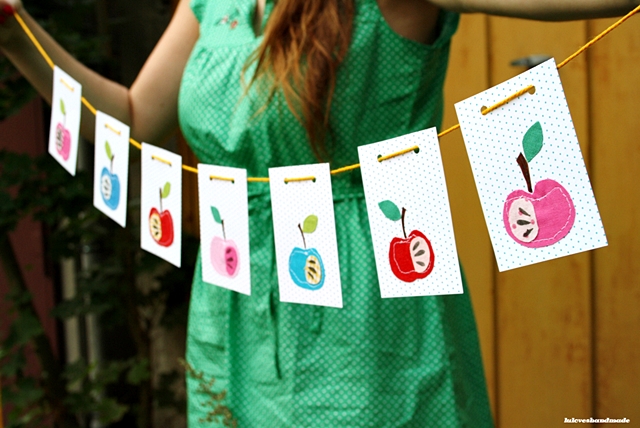
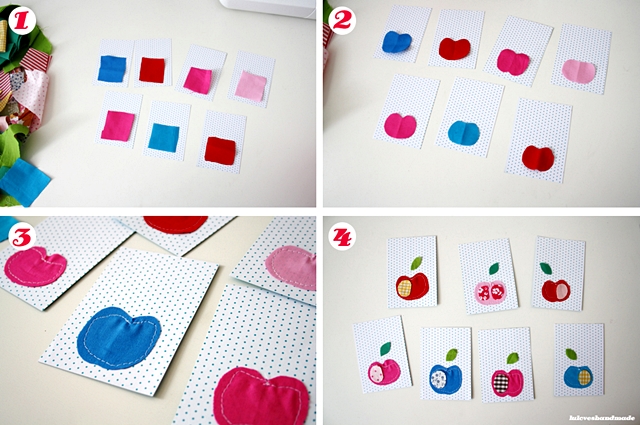 Schneidet euch als Wimpel ein paar gleich große Karten aus dem Pappkarton aus. Dann schneidet aus Stoffresten kleine apfelförmige Stücke aus. Diese könnt ihr dann per Hand oder mit der Nähmaschine auf den Karton nähen. Dann nehmt noch mehr Stoffreste für die Blätter und um die Äpfel zu verzieren.
For making your buntings, cut out some pieces of cardboard of about the same size. Then cut out some apple-shaped pieces of fabric and sew them onto the cardboard, either with a sewing machine, or by hand. Then take even more fabric scraps for the leaves and to embellish the apples.
Schneidet euch als Wimpel ein paar gleich große Karten aus dem Pappkarton aus. Dann schneidet aus Stoffresten kleine apfelförmige Stücke aus. Diese könnt ihr dann per Hand oder mit der Nähmaschine auf den Karton nähen. Dann nehmt noch mehr Stoffreste für die Blätter und um die Äpfel zu verzieren.
For making your buntings, cut out some pieces of cardboard of about the same size. Then cut out some apple-shaped pieces of fabric and sew them onto the cardboard, either with a sewing machine, or by hand. Then take even more fabric scraps for the leaves and to embellish the apples.
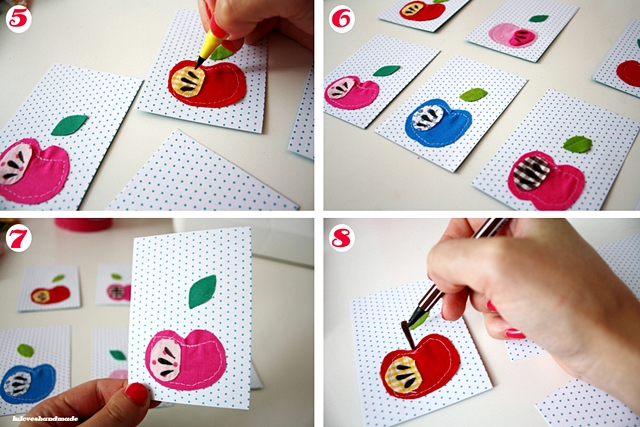 Mit einem Textilstift oder auch Filzstift könnt ihr nun schwarze Kerne auf die Äpfel malen und dann die Blätter und die Verzierungen aufkleben. Nehmt danach euren braunen Filzstift um den Stiel aufzumalen.
You can now paint the seeds onto the apples with a textile pen or with a felt tip and then you can glue the embellishments and the leaves onto the apples and the cardboard. Afterwards, take your brown felt tip to paint the stalk.
Mit einem Textilstift oder auch Filzstift könnt ihr nun schwarze Kerne auf die Äpfel malen und dann die Blätter und die Verzierungen aufkleben. Nehmt danach euren braunen Filzstift um den Stiel aufzumalen.
You can now paint the seeds onto the apples with a textile pen or with a felt tip and then you can glue the embellishments and the leaves onto the apples and the cardboard. Afterwards, take your brown felt tip to paint the stalk.
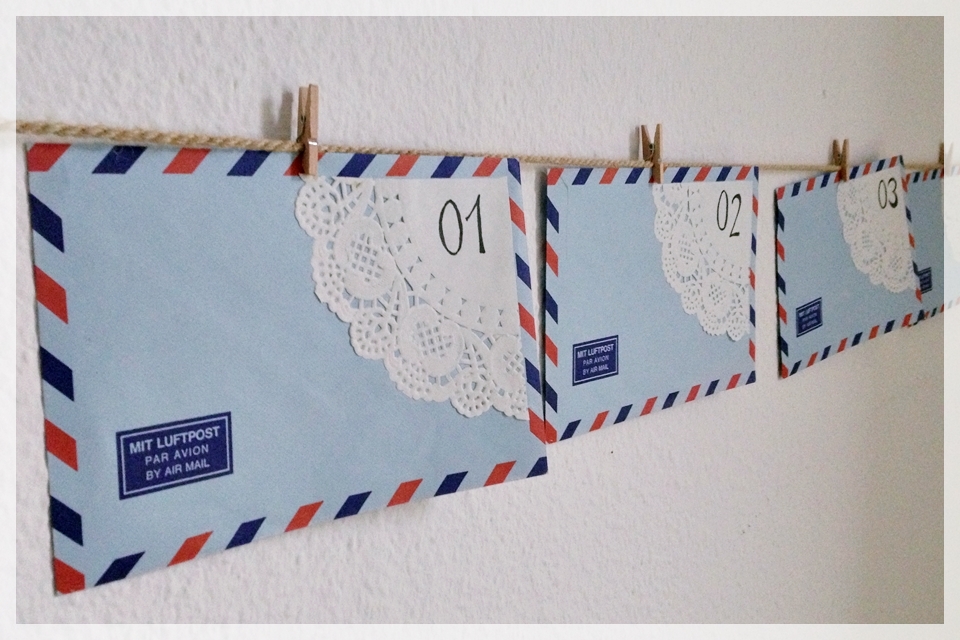
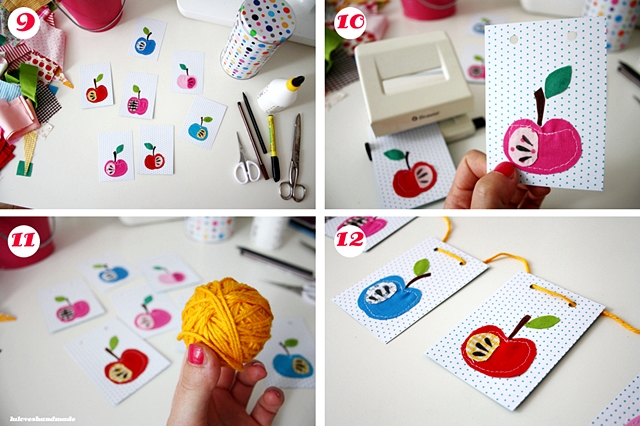 Nun müssen die Karten nur noch gelocht werden und dann könnt ihr die Wolle zum Aufhängen durchziehen.
Fertig! 🙂
Danke nochmal für die Einladung, liebe Katha, es war mir eine Freude! 🙂
Now you only need to punch holes in the cardboard and then you can thread in the wool to hang up the bunting.
That’s it! 🙂
Thank you again for the invitation, dear Katha, it was a pleasure! 🙂
Nun müssen die Karten nur noch gelocht werden und dann könnt ihr die Wolle zum Aufhängen durchziehen.
Fertig! 🙂
Danke nochmal für die Einladung, liebe Katha, es war mir eine Freude! 🙂
Now you only need to punch holes in the cardboard and then you can thread in the wool to hang up the bunting.
That’s it! 🙂
Thank you again for the invitation, dear Katha, it was a pleasure! 🙂