![kathastrophal // meet Stefanie [Squeaky Swing]](https://kathastrophal.de/wp-content/uploads/2012/09/squeakyswing.png) Als letzte Gastposterin dieser Serie darf ich euch heute die hinreißende Stefanie von Squeaky Swing vorstellen. Als ich zum ersten Mal auf Stefanies Blog war, wusste ich direkt dass ich etwas besonderes entdeckt hatte: Ihr gesamtes Blog-Design wurde von ihr selbst gezeichnet und geschrieben, und der Blog selbst quillt nur so über vor hübschen Dingen – wunderschöne Outfitposts, inspirierende Do It Yourself – Anleitungen, leckere Rezepte, wunderbare Fotografien von ihrem Leben als junge Lehrerin in der Schweiz und Inspirationsbeiträge, die immer noch viel mehr Ideen liefern. Das Ganze hat so einen gewissen Retro-Vintage-Touch, den ich liebe – Ich glaube ModCloth sollte dringend mal Sponsor für den Kleiderschrank der Hübschen werden. :]
Heute zeigt euch Stefanie, wie man selbst gehäkelte Haar-Accessoires zaubern kann. Ihr wisst ja bestimmt, dass ich Schleifchen liebe… Dieses Tutorial sorgt also definitiv dafür, dass ich endlich Stricken und Häkeln lernen will!
Als letzte Gastposterin dieser Serie darf ich euch heute die hinreißende Stefanie von Squeaky Swing vorstellen. Als ich zum ersten Mal auf Stefanies Blog war, wusste ich direkt dass ich etwas besonderes entdeckt hatte: Ihr gesamtes Blog-Design wurde von ihr selbst gezeichnet und geschrieben, und der Blog selbst quillt nur so über vor hübschen Dingen – wunderschöne Outfitposts, inspirierende Do It Yourself – Anleitungen, leckere Rezepte, wunderbare Fotografien von ihrem Leben als junge Lehrerin in der Schweiz und Inspirationsbeiträge, die immer noch viel mehr Ideen liefern. Das Ganze hat so einen gewissen Retro-Vintage-Touch, den ich liebe – Ich glaube ModCloth sollte dringend mal Sponsor für den Kleiderschrank der Hübschen werden. :]
Heute zeigt euch Stefanie, wie man selbst gehäkelte Haar-Accessoires zaubern kann. Ihr wisst ja bestimmt, dass ich Schleifchen liebe… Dieses Tutorial sorgt also definitiv dafür, dass ich endlich Stricken und Häkeln lernen will!
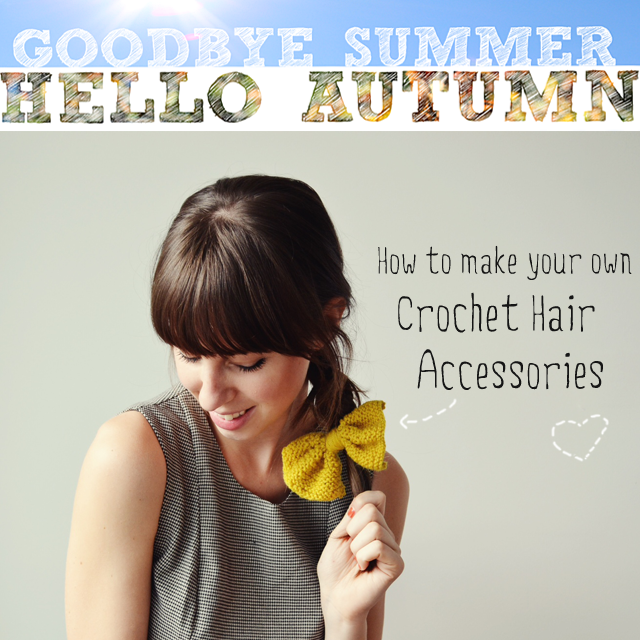 Hey everyone, I’m so glad to be here on Katha’s pretty blog today! My name is Stefanie and you can meet me on my blog Squeaky Swing where I love writing about fashion, DIY and everyday life. I have prepared an easy DIY for you guys if you like handmade hair accessories. Well I do, so I thought I want to make my very own crochet hair accessories as I have seen them all around the web. So here’s how:
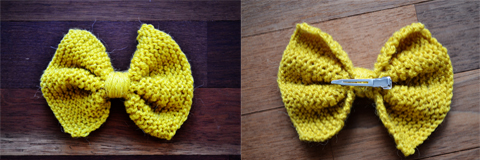
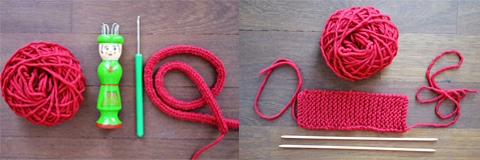 What you’ll need: A cord made with a Knitting Nancy (see how it works here), and a rectangular piece of knitted fabric (about 10 loops and 15cm in length)
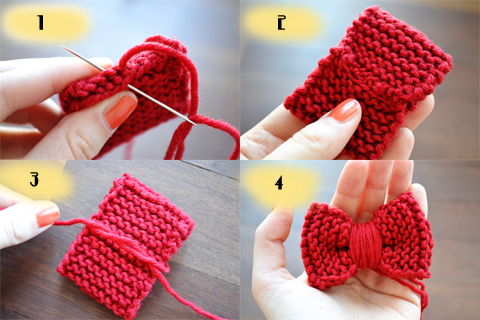 Step 1: Sew the fabric together with easy stitches.
Step 2: This is how it’ll look after Step 1.
Step 3: Cut a thread of your wool and tie it around the middle of the knitted piece, front up. Tie it really close and wrap the thread around your piece tying a knot at the back and leaving about 10cm of thread.
Step 4: This is the front after Step 3.
Step 1: Sew the fabric together with easy stitches.
Step 2: This is how it’ll look after Step 1.
Step 3: Cut a thread of your wool and tie it around the middle of the knitted piece, front up. Tie it really close and wrap the thread around your piece tying a knot at the back and leaving about 10cm of thread.
Step 4: This is the front after Step 3.
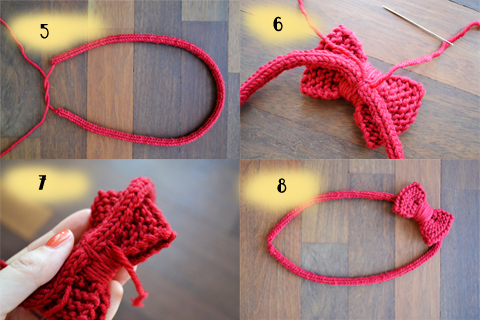 Step 5: Before you knit the cord measure the volume of your head and then knit this length. When finished tie the remaining threads tight and cut them off.
Step 6: Tie the bow to the cord, really tight!
Step 7: If you want to you can sew the whole length of the bow to the cord so it’ll hold really well.
Step 8: DONE! Yay!!! –> I tied my bow a little bit to the side of the cord, because I’m going to wear it on the side of my head anyway.
Step 5: Before you knit the cord measure the volume of your head and then knit this length. When finished tie the remaining threads tight and cut them off.
Step 6: Tie the bow to the cord, really tight!
Step 7: If you want to you can sew the whole length of the bow to the cord so it’ll hold really well.
Step 8: DONE! Yay!!! –> I tied my bow a little bit to the side of the cord, because I’m going to wear it on the side of my head anyway.
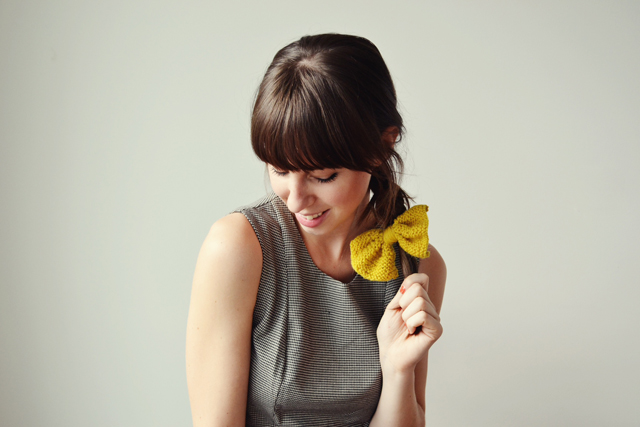
 If you feel like it you can use the same technique to make a bigger bow which you can stitch to your favorite dress.
Here are some ideas on how you can wear your handmade accessories. Have fun!
If you feel like it you can use the same technique to make a bigger bow which you can stitch to your favorite dress.
Here are some ideas on how you can wear your handmade accessories. Have fun!


 It was so much fun being here and preparing this post for the lovely Katha. Thank you so much!
XO, Stefanie
 Thank you so much for this lovely tutorial, dear Stefanie! ♥
Vielen lieben Dank für dieses wunderbare Tutorial, liebe Stefanie! ♥
[I’m on vacation & taking a little blogging break right now. You can follow along on Instagram if you’d like!
Im Moment bin ich im Urlaub & mache eine kleine Blog-Pause. Wenn ihr mögt, könnt ihr ein bisschen davon bei Instagram mitbekommen!]
Thank you so much for this lovely tutorial, dear Stefanie! ♥
Vielen lieben Dank für dieses wunderbare Tutorial, liebe Stefanie! ♥
[I’m on vacation & taking a little blogging break right now. You can follow along on Instagram if you’d like!
Im Moment bin ich im Urlaub & mache eine kleine Blog-Pause. Wenn ihr mögt, könnt ihr ein bisschen davon bei Instagram mitbekommen!]


9 Kommentare
She is gorgeous!!
Wow, was für ein hübsches Mädchen! Und mit Schleifen kriegt man mich eh rum 😉
22. September 2012 um 11:01Ihr Blog wandert direkt mal auf meine Blogliste 🙂
Awwwwww, so schön!!! <3 Das ist voll süß gemacht, muss ich unbedingt nach machen! <3 Und sehr hübsch siehst Du aus, liebe Stefanie!!
22. September 2012 um 11:05Schönes Wochenende und super Auswahl an Gastbloggern, liebe Katha! 🙂
Klasse Gastbloggerinnen hast du vorgestellt. Und ich glaube ich werde Stephanie auch mal besuchen gehen. :-))
Ich habe dich getaggert… http://www.fashionnfreak.blogspot.de
LG, Petra
22. September 2012 um 22:34Hoch Gottchen, was sind die Schleifen süß! Jetzt freue ich mich umso mehr darauf endlich häckeln zu lernen! Ich habe mir ein „Häckeln für Dummies“-Set gekauft und brauche jetzt nur noch etwas Zeit um mich endlich dran zu machen.
Danke für den Anreiz!
Herzliche Grüße,
23. September 2012 um 14:22Miss Sugar Shack
[…] ← DIY Tutorial for Crochet Hair Accessories {Meet Stefanie – Squeaky Swing} […]
23. September 2012 um 19:21Wow, that looks georgeous! 🙂 If I could only do that myself…
24. September 2012 um 07:45Ein tolles Tutorial, danke Stefanie! Werde ich jetzt im Herbst bestimmt mal nachmachen! Nur die Strickliesel fehlt mir noch. (: Ich liebe Schleifen auch über alles!
26. September 2012 um 18:30Die Schleifen sind ganz süß… vielleicht probier ich das auch mal 🙂
05. November 2012 um 17:03[…] 1. Ripple Blanket Tutorial from Attic 24 2. Pippy Slippers from Meet Me At Mikes 3. 5 Minute Heart from Good Knits 4. Vintage Fan Ripple Stitch Pattern 5. Crochet Flowers from Amy’s Odyssey 6.Rainbow Blanket from The Crafty Mummy 7. Crochet Hair Accessories from kathastrophal […]
13. April 2013 um 02:00